Video walkthrough
Read the written stepsRead the transcript
Before you watch
- Have approved broker details, any applicable tenant profile and the required disclosure language ready.
- The practice uses only fictional contacts and a training disclosure. Printed confidentiality text is separate from Listing Hub or Deal Room access controls.
Outcome
Go from a blank draft to a finished OM PDF in one sitting, with every fact, photo, and figure telling the same story.
Navigation path
Dashboard > Create New > Offering Memorandum > Document Wizard
Access
Offering Memorandum creation is available through the standard document flow. Template and publishing options follow the current plan.
On this page
What you will accomplish
Work through these ten steps in order. Each step matches the lesson with the same number in the Create an Offering Memorandum tutorial and links to a focused guide. Skip steps 5, 7, and 8 when your OM does not need a custom map, a rent roll, or an operating statement. The sections your OM shows depend on its property type and financial scope.
Start with one property
For a first OM, choose Single Property and the property type that matches the asset. Choose Multiple Properties only for a campus, assemblage, or portfolio.
Before you start
Data, sources, and access to prepare
- Authority to market the property
- Property facts: address, asking price, building size or unit count, and year built
- Photos, with your strongest exterior shot first, plus any site plan or aerial
- Your rent roll and T-12 or operating statement, if the OM includes financials
- Your logo, brand color, and the broker contacts to list
Prepare these details
- Major-tenant logos, if your property type supports tenant profiles
- Your confidentiality language, if your company uses its own
- One source for every financial figure, so the numbers agree everywhere
Complete the task
1. Create the OM draft
- 1
Choose Offering Memorandum
Dashboard > Create New > Select a Marketing Package
Select Offering Memorandum.
Expected result: The property structure, property type, brand color, and template choices follow.
If this step does not work
The setup guide walks through each screen, including creating an account at the end.
Lesson 1: set up the document
2. Enter the property facts
- 1
Open Property Details
Document Sections or Sections drawer
Select Property Details.
Expected result: Property Name, the address, and the asking price are ready to fill in.
If this step does not work
Physical facts such as building size live in Property Data, the next section.
Lesson 2: property facts and units
3. Write the property story
- 1
Open Executive Summary
Document Sections or Sections drawer
Select Executive Summary.
Expected result: Your draft opens with the summary and an optional headline.
If this step does not work
Suggested copy gives you a head start; the narrative guide covers Investment Highlights and Location Highlights too.
Lesson 3: write the narrative
4. Add and arrange the photos
- 1
Open Images & Media
Document Sections or Sections drawer
Select Images & Media.
Expected result: Cover Image, Single-Page Images, and Multi-Image Page are ready for uploads.
If this step does not work
Upload into the zone that matches each photo. The photo guide covers ordering and cropping.
Lesson 4: upload, order, and crop
5. Add a location map (optional)
- 1
Open Maps
Document Sections or Sections drawer
Select Maps when the OM needs a custom map.
Expected result: The Maps workspace opens with Create Map and any saved map cards.
If this step does not work
Maps uses the address saved in Property Details. Skip this step when the OM does not need a custom map.
Lesson 5: create and save the map
6. Choose the financial scope
- 1
Choose the financial scope
Document Sections > Financials
Select Full Financials, Rent Roll Only, Cap Rate & NOI, or Skip Financials.
Expected result: The wizard adds only the financial sections that scope needs.
If this step does not work
Pick the scope that matches the numbers you have. Net Lease does not offer Rent Roll Only.
Lesson 6: choose financial scope
7. Build the rent roll (optional)
- 1
Open Rent Roll
Document Sections or Sections drawer
Select Rent Roll.
Expected result: The rent-roll editor for your property type opens.
If this step does not work
Rent Roll appears for Full Financials and Rent Roll Only. Skip this step for Cap Rate & NOI or Skip Financials.
Lesson 7: build and check the rent roll
8. Enter income and expenses (optional)
- 1
Open Income & Expenses
Document Sections or Sections drawer
Select Income & Expenses.
Expected result: The operating statement opens with income, expense, and NOI totals.
If this step does not work
Income & Expenses appears for Full Financials. For Cap Rate & NOI, enter NOI or the cap rate in Valuation instead.
Lesson 8: income, expenses, and NOI
9. Confirm contacts and disclosure
- 1
Open Contact Info
Document Sections or Sections drawer
Select Contact Info.
Expected result: Your contact card and any co-listing contacts appear.
If this step does not work
The sections below cover contacts, tenant profiles, and the confidentiality statement.
10. Review every page and download the PDF
- 1
Open Review & Customize
Document Sections or Sections drawer
Select Review & Customize.
Expected result: Your assembled OM and its page thumbnails load.
If this step does not work
The review guide covers fixing content at its source, image framing, page order, and design.
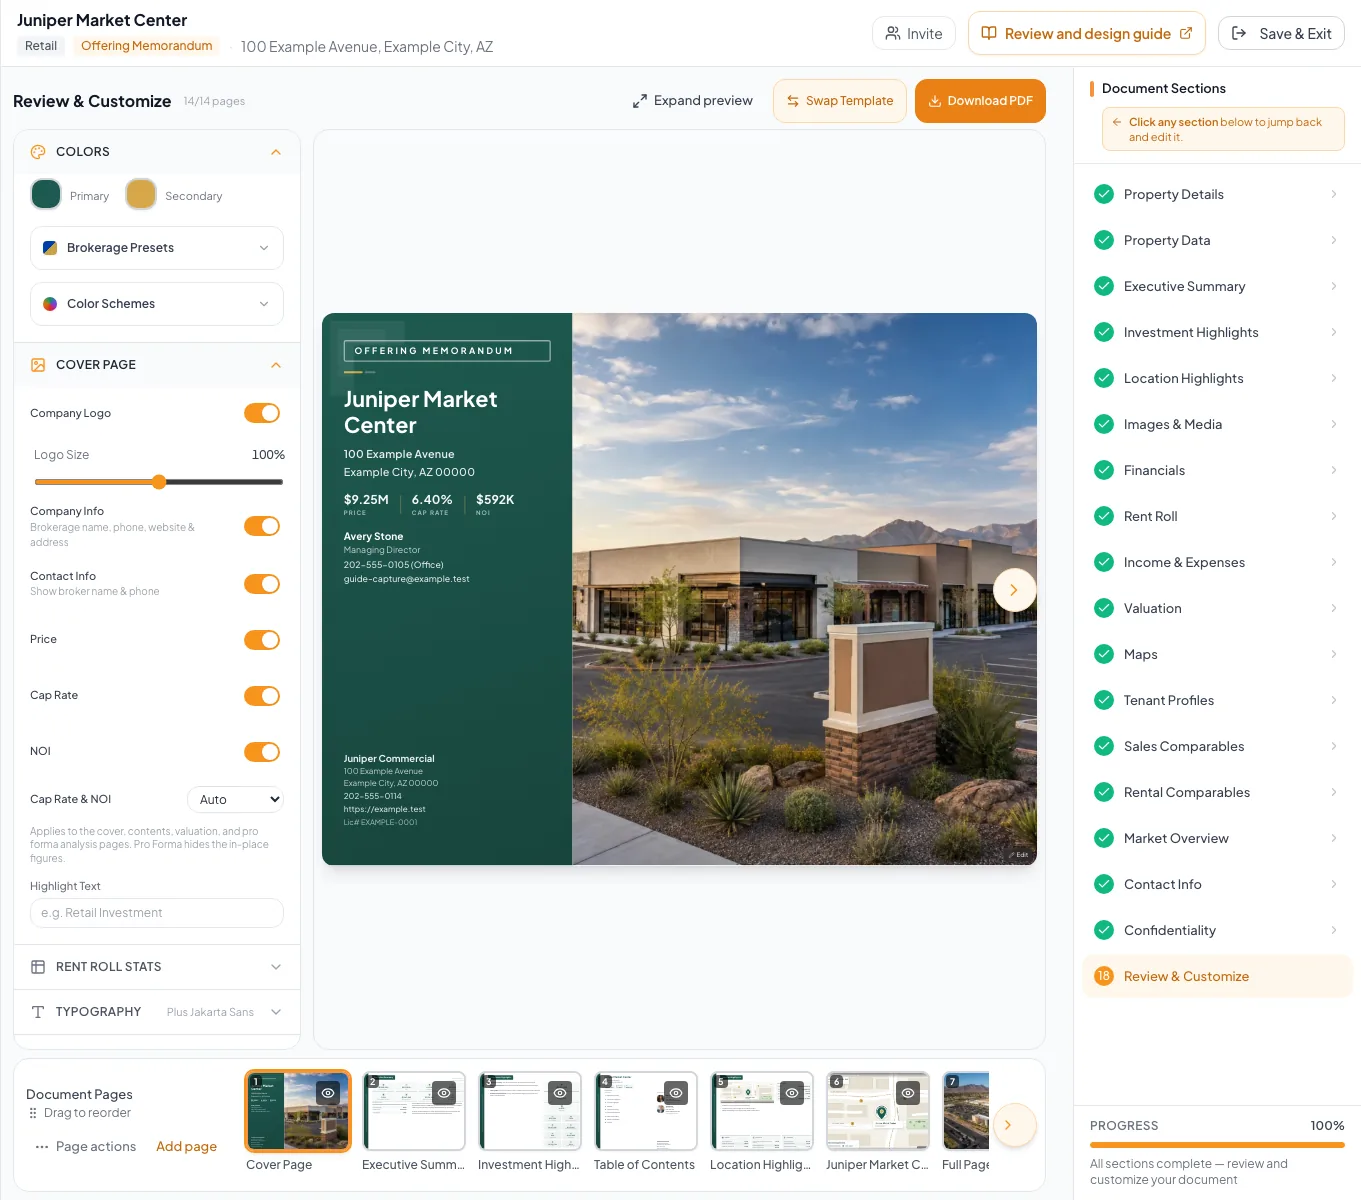
Finish the Offering Memorandum by reviewing entered content, page design, conditional sections, and delivery readiness. - 2
Generate the current PDF
Review & Customize
Select Download PDF.
Expected result: The button shows Generating... and the new PDF downloads.
If this step does not work
Open the new file and page through it. A PDF you downloaded earlier keeps its old content.
Lesson 10: review and download the PDF
Choose the contacts shown in the OM
Contact Info sets the broker cards printed in your OM. Your own card comes from your profile, so you edit it there. An OM can list up to four contacts.
You (primary contact)
- Where it comes from
- Your profile
- How to change it
- Select Edit Profile, update your profile, then come back to the document.
Co-listing agent
- Where it comes from
- Add Co-Listing Agent
- How to change it
- Type the details directly in the document. Free accounts can list two contacts in total, including you.
Teammates
- Where it comes from
- Add Team Member
- How to change it
- Paid accounts can pick teammates; their cards use each teammate's profile. Coordinators are not listed as document contacts.
Maximum
- Where it comes from
- All of the above
- How to change it
- Up to four contacts per OM.
Set up the contact page
- 1
Verify the primary contact
Contact Info, primary contact card
Compare your contact card with your current details.
Expected result: Your name, title, phone, and email are correct.
If this step does not work
Select Edit Profile, then Go to Profile to fix them; CREBuilder saves the document first. Keep Editing Here closes the box without leaving.
- 2
Add an editable co-listing contact
Contact Info
Select Add Co-Listing Agent.
Expected result: A second-contact form appears.
If this step does not work
The button disappears once the second-contact slot is filled.
- 3
Enter the co-listing details
Co-Listing Agent form
Enter the co-listing agent's full name, email, and phone.
Expected result: The contact card shows the details you entered.
If this step does not work
Check the spelling against the agent's signature or license record.
- 4
Add a team contact
Add Team Member
Select the teammate card you want to list.
Expected result: A read-only contact card is added from that teammate's profile.
If this step does not work
If a teammate is missing, open Manage Team in Settings.
- 5
Save the contact list
Wizard footer
Select Continue.
Expected result: Your contacts save and the next section opens.
If this step does not work
If Failed to save contacts appears, stay on the page, check your connection, and try again.
My own contact details are wrong
Likely cause: Your card comes from your profile, not the document.
- Select Edit Profile.
- Select Go to Profile and correct your details.
- Return to the document and check the card.
A teammate is not listed
Likely cause: They may already be on the OM, be a Coordinator, or belong to a different team.
- Check the existing contact cards.
- Open Manage Team in Settings.
- Check the teammate's role, then return.
I cannot add another contact
Likely cause: The OM already lists four contacts.
- Remove a co-listing contact you do not need.
Contact details printed in the OM
Full Name and Title Required
The person and role printed on the contact page.
- Format
- Plain text
- Units
- Not applicable
- Save behavior
- Your own details save in your profile. Co-listing details save when you select Continue on Contact Info.
- Downstream effect
- Identifies each broker in the finished OM.
Email and Phone Recommended
How buyers reach each broker.
- Format
- Valid email address and formatted phone number
- Units
- Not applicable
- Save behavior
- Your own details save in your profile. Co-listing details save when you select Continue on Contact Info.
- Downstream effect
- Lets buyers contact the right person.
License Number Optional
A broker license number, where your market requires it.
- Format
- Plain text
- Units
- Not applicable
- Save behavior
- Saves in your profile or the co-listing form when you select Continue.
- Downstream effect
- Prints with the contact where the template shows it.
Profile Photo and Company Logo Optional
The headshot and logo used on contact layouts.
- Format
- Uploaded image
- Units
- Not applicable
- Save behavior
- Upload in your profile or company settings; Contact Info uses the saved images.
- Downstream effect
- Can appear on the contact page and other branded pages.
Full Name and Title
- Requirement
- Required
- What it means
- The person and role printed on the contact page.
- Format
- Plain text
- Units
- Not applicable
- Save behavior
- Your own details save in your profile. Co-listing details save when you select Continue on Contact Info.
- Downstream effect
- Identifies each broker in the finished OM.
Email and Phone
- Requirement
- Recommended
- What it means
- How buyers reach each broker.
- Format
- Valid email address and formatted phone number
- Units
- Not applicable
- Save behavior
- Your own details save in your profile. Co-listing details save when you select Continue on Contact Info.
- Downstream effect
- Lets buyers contact the right person.
License Number
- Requirement
- Optional
- What it means
- A broker license number, where your market requires it.
- Format
- Plain text
- Units
- Not applicable
- Save behavior
- Saves in your profile or the co-listing form when you select Continue.
- Downstream effect
- Prints with the contact where the template shows it.
Profile Photo and Company Logo
- Requirement
- Optional
- What it means
- The headshot and logo used on contact layouts.
- Format
- Uploaded image
- Units
- Not applicable
- Save behavior
- Upload in your profile or company settings; Contact Info uses the saved images.
- Downstream effect
- Can appear on the contact page and other branded pages.
Required means the field is needed to complete or support this workflow. Some screens allow a draft to save before every required item is complete. The steps and troubleshooting call out controls the product actively blocks.
Build major-tenant profiles
Tenant Profiles turn your anchor and major tenants into marketing cards with a logo, a short story, and key facts. They are separate from rent-roll rows, so add a profile for each tenant you want to feature. The tenant page appears once at least one profile is saved and your property type supports it.
Which property types show tenant profiles
Retail, Office and Medical Office, Industrial, and Mixed-Use OMs can include tenant profiles. Standard Multifamily, Land, Hospitality, Self-Storage, Mobile Home Park, and Net Lease OMs do not include the tenant page. Custom templates can differ, so check Review & Customize.
Add a tenant profile
- 1
Open Tenant Profiles
Document Sections or Sections drawer
Select Tenant Profiles.
Expected result: Your tenant cards, or the empty state, appear.
If this step does not work
If the section is missing, your property type or package does not include tenant profiles.
- 2
Start a tenant profile
Tenant Profiles
Select Add Tenant.
Expected result: The Add Tenant Profile dialog opens.
If this step does not work
Select Add First Tenant when the empty state shows that button instead.
- 3
Fill in the tenant card
Add Tenant Profile
Enter the Trade Name plus any other tenant facts you have.
Expected result: Trade Name is filled in and Add Tenant becomes available.
If this step does not work
Select Upload Logo to add the tenant logo. Description is limited to 2,000 characters. Leave any fact blank that you cannot confirm.
- 4
Save the tenant profile
Add Tenant Profile footer
Select Add Tenant.
Expected result: The dialog closes and the tenant card appears.
If this step does not work
If Logo upload failed appears, try another image file before saving.
- 5
Correct a saved profile
Tenant profile card
Select Edit on the card.
Expected result: Edit Tenant Profile opens with the saved values, and Save Changes stores your corrections.
If this step does not work
Hover over the card if its action icons are hidden. If a save fails, read the error message and try again.
The tenant is in the rent roll but has no profile
Likely cause: Rent-roll rows and tenant profiles are separate on purpose.
- Open Tenant Profiles.
- Add a profile for each major tenant you want to feature.
The tenant page is missing from the OM
Likely cause: No profile is saved, or the property type or template does not include the page.
- Confirm at least one tenant card exists.
- Check the property-type note above.
- Look for the page in Review & Customize.
A profile was deleted by mistake
Likely cause: Delete removes the profile permanently after you confirm.
- Add the profile again.
- Check the tenant page in Review & Customize.
Tenant profile fields
Trade Name Required
The tenant brand shown on the card.
- Format
- Plain text
- Units
- Not applicable
- Save behavior
- Saves when you select Add Tenant or Save Changes.
- Downstream effect
- Add Tenant stays unavailable until this field has text.
Description Recommended
A short summary of the business and why it matters to the property.
- Format
- Plain text, up to 2,000 characters
- Units
- Characters
- Save behavior
- Saves when you select Add Tenant or Save Changes.
- Downstream effect
- The story shown on the tenant page.
Logo Optional
The tenant logo.
- Format
- Uploaded image file
- Units
- Not applicable
- Save behavior
- Let the upload finish, then save the profile before closing the dialog.
- Downstream effect
- Adds instant brand recognition to the card.
Industry, Year Founded, Headquarters, and # of Locations Optional
Business facts that support the tenant story.
- Format
- Text plus calendar-year and whole-number values
- Units
- Calendar year and locations where applicable
- Save behavior
- Saves when you select Add Tenant or Save Changes.
- Downstream effect
- Print as profile facts when filled in.
Website and Credit Rating Optional
The tenant website and its credit rating, or Not Rated.
- Format
- Website URL plus a selected rating or Not Rated
- Units
- Not applicable
- Save behavior
- Saves when you select Add Tenant or Save Changes.
- Downstream effect
- Print as reference facts when filled in.
Square Feet and Lease Expiration Optional
The tenant's space and lease term at this property.
- Format
- Whole-number area plus a date or label
- Units
- Square feet and date
- Save behavior
- Saves when you select Add Tenant or Save Changes.
- Downstream effect
- Ties the profile to the property when filled in.
Trade Name
- Requirement
- Required
- What it means
- The tenant brand shown on the card.
- Format
- Plain text
- Units
- Not applicable
- Save behavior
- Saves when you select Add Tenant or Save Changes.
- Downstream effect
- Add Tenant stays unavailable until this field has text.
Description
- Requirement
- Recommended
- What it means
- A short summary of the business and why it matters to the property.
- Format
- Plain text, up to 2,000 characters
- Units
- Characters
- Save behavior
- Saves when you select Add Tenant or Save Changes.
- Downstream effect
- The story shown on the tenant page.
Logo
- Requirement
- Optional
- What it means
- The tenant logo.
- Format
- Uploaded image file
- Units
- Not applicable
- Save behavior
- Let the upload finish, then save the profile before closing the dialog.
- Downstream effect
- Adds instant brand recognition to the card.
Industry, Year Founded, Headquarters, and # of Locations
- Requirement
- Optional
- What it means
- Business facts that support the tenant story.
- Format
- Text plus calendar-year and whole-number values
- Units
- Calendar year and locations where applicable
- Save behavior
- Saves when you select Add Tenant or Save Changes.
- Downstream effect
- Print as profile facts when filled in.
Website and Credit Rating
- Requirement
- Optional
- What it means
- The tenant website and its credit rating, or Not Rated.
- Format
- Website URL plus a selected rating or Not Rated
- Units
- Not applicable
- Save behavior
- Saves when you select Add Tenant or Save Changes.
- Downstream effect
- Print as reference facts when filled in.
Square Feet and Lease Expiration
- Requirement
- Optional
- What it means
- The tenant's space and lease term at this property.
- Format
- Whole-number area plus a date or label
- Units
- Square feet and date
- Save behavior
- Saves when you select Add Tenant or Save Changes.
- Downstream effect
- Ties the profile to the property when filled in.
Required means the field is needed to complete or support this workflow. Some screens allow a draft to save before every required item is complete. The steps and troubleshooting call out controls the product actively blocks.
Review the confidentiality statement
Confidentiality sets the disclaimer page printed in your OM. It is separate from the Deal Room NDA. Start from a built-in or saved template, then tailor the wording for this property.
You are typing
- What happens
- Changes save automatically a few seconds after you stop.
- What to do
- Wait for Auto-saved before you review. Moving to another section also saves your text.
You apply a template
- What happens
- The template replaces the current text after you confirm.
- What to do
- Read the new text in full before you leave.
Your administrator manages the statement
- What happens
- A lock banner appears and editing is turned off.
- What to do
- Ask your administrator to change the wording.
The statement is empty
- What happens
- The confidentiality page has nothing to print.
- What to do
- Add your statement when the OM needs the page.
Set the confidentiality statement
- 1
Open Confidentiality
Document Sections or Sections drawer
Select Confidentiality.
Expected result: The current statement appears.
If this step does not work
If a lock banner appears, your administrator manages this statement; ask them for changes.
- 2
Open the template list
Confidentiality Statement header
Select Templates.
Expected result: Built-in templates and your saved templates appear.
If this step does not work
Skip templates when the statement already says what you need.
- 3
Choose a template
Templates menu
Select the template you want.
Expected result: The text changes, or Replace Content asks before overwriting existing text.
If this step does not work
Select Replace Content only when you want to overwrite the current text. This cannot be undone.
- 4
Edit the statement
Confidentiality editor
Edit the wording for this property.
Expected result: Your company name appears wherever the template uses it.
If this step does not work
If you see [COMPANY_NAME] instead of your company name, type your company name in its place.
- 5
Wait for autosave
Wizard footer
Wait for Auto-saved to appear.
Expected result: Your latest wording is saved.
If this step does not work
Keep the page open while it shows Saving...
- 6
Check the confidentiality page
Document Sections or Sections drawer
Select Review & Customize.
Expected result: The confidentiality page in your OM shows your statement.
If this step does not work
Return to Confidentiality if the text is missing or out of date.
Template controls are missing
Likely cause: Your administrator manages and locks the statement.
- Read the lock banner.
- Send your requested wording to the administrator.
A template would overwrite my edits
Likely cause: Templates replace all of the current text.
- Cancel the confirmation.
- Copy any wording you want to keep.
- Apply the template, then paste your wording back in.
The confidentiality page is missing from Review
Likely cause: The statement is empty or the template does not include the page.
- Confirm your statement is saved.
- Check page visibility in Review & Customize.
OM completion reference
Property facts
- Source to check against
- Survey, assessor record, leases, or owner records
- Done when
- Name, address, areas, and dates agree everywhere
Marketing story
- Source to check against
- Your positioning and property facts
- Done when
- Every claim is specific and backed by a fact
Financials
- Source to check against
- Rent roll and T-12 or operating statement
- Done when
- Totals and units reconcile
Photos and maps
- Source to check against
- Your photo set and the property location
- Done when
- Images are sharp and map pins are in the right place
Final PDF
- Source to check against
- The latest saved document
- Done when
- No placeholders, overflowing text, or old pages
Troubleshooting and next steps
A page shows the wrong fact.
Likely cause: The value may come from a property field rather than the narrative text.
- Use the page edit action in Review & Customize when it appears.
- Fix the source section and download a new PDF.
A section is missing from the OM.
Likely cause: The package, property type, financial scope, template, or page visibility can leave it out.
- Check the document setup and that the section is complete.
- Check page visibility in Review & Customize.
Final verification
- The cover shows the right property and transaction
- Narrative facts match the property fields
- Financial totals match your rent roll and operating statement
- Every image and map belongs to this property
- Contacts and the confidentiality page are current
- You paged through the newly downloaded PDF
- No blocking warning, failed status, or unresolved validation message remains in the completed workflow.
Your next OM, done this afternoon
Turn your property facts, photos and financials into a polished, branded offering memorandum. Most brokers finish in 30 to 90 minutes.
No credit card required.