Outcome
Every listing uses the right gate, and each identified visitor becomes a CRM contact you can follow up with.
Navigation path
Listing Hub > Listings or Access & leads
Access
Anyone who manages a listing can set its access level. The inquiry form, broker email, and NDA question settings apply company-wide and are managed by Admins.
On this page
What you will accomplish
Visitor access paths
Each level asks the visitor for a little more before protected material opens.
Visitor opens listing
Free Access
Email Required
NDA – Auto Access
NDA – Approval Required
- Visitor opens listingFree Access
- Visitor opens listingEmail Required
- Visitor opens listingNDA – Auto Access
- NDA – Auto AccessNDA – Approval RequiredAdd your approval
Before you start
Data, sources, and access to prepare
- A listed property
- Your confidentiality approach for this deal
- A test email address you control
Prepare these details
- Decide what stays public and what needs a gate
- Confirm your NDA qualification questions
- Choose who approves requests
- Have a test email address ready
Complete the task
- 1
Open the property access control
Listing Hub > Listings
Open the access menu on the property row.
Expected result: The four access levels appear for that listing.
If this step does not work
Confirm you can edit the listing if the menu is disabled.
- 2
Select one access option
Listing access menu
Choose Free Access, Email Required, NDA – Auto Access, or NDA – Approval Required.
Expected result: The row shows the new level. Moving to a lighter level asks you to confirm first.
If this step does not work
Set up your NDA questions in Settings > NDA & Access before choosing an NDA level if they are not ready.
- 3
Set inquiry visibility
Listing Hub > Access & leads > Inquiry form
Turn Show inquiry form on public listing pages on or off.
Expected result: Every public property page follows this company setting.
If this step does not work
Ask an Admin if Access & leads is not visible to you.
- 4
Choose public broker email visibility
Listing Hub > Access & leads > Public broker email
Turn off Show broker email on public listings to hide broker email addresses while keeping the inquiry form enabled.
Expected result: Broker contact emails are omitted from public listing pages, embedded listings, and access portals. Inquiry notifications still reach the saved contacts.
If this step does not work
This does not redact PDFs, brochures, or email addresses manually entered in page text. Review those separately.
- 5
Review NDA questions
Settings > NDA & Access
Review the company qualification questions.
Expected result: The questions match what you want to learn from NDA signers.
If this step does not work
Remove questions you do not need before testing.
- 6
Open the public listing
Listing row > public preview
Open the property page in a private window.
Expected result: The selected gate appears before protected material.
If this step does not work
Use a private window so your own session does not skip the gate.
- 7
Complete the test gate
Public property page
Submit the gate with your test email address.
Expected result: You get access, or a pending-approval message for NDA – Approval Required.
If this step does not work
Read the exact message before changing settings.
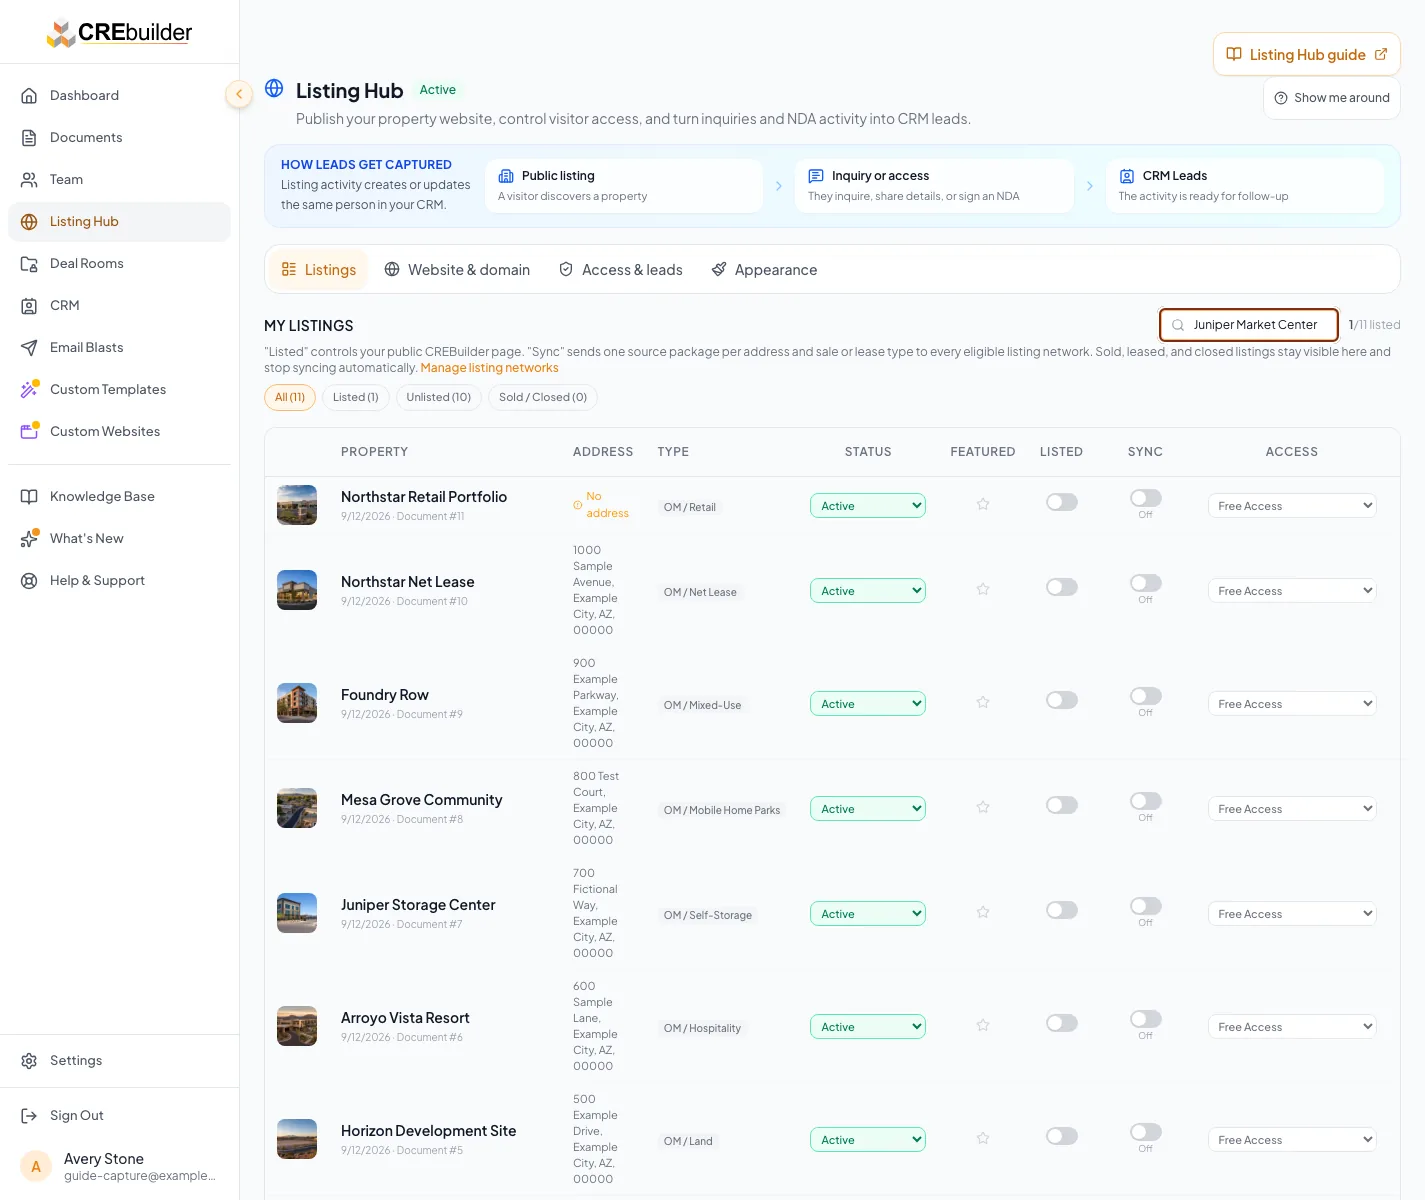
Open the public listing as a visitor and complete the gate to confirm exactly what a prospect must provide. - 8
Find the CRM activity
CRM > Leads or Contacts
Search for the test email address.
Expected result: The contact shows the inquiry or access activity on its timeline.
If this step does not work
Free Access stays anonymous, so test with Email Required, an NDA level, or the inquiry form.
Test the buyer request for a multiple-signer NDA
When a listing’s Deal Room uses multiple-signer NDAs, buyers request the NDA instead of signing it right away. They can suggest up to five more buyers or buyer agents. You add the seller or anyone else yourself before sending.
- 1
Answer qualification questions
Signed-out property page > Your info
Fill in the buyer details and qualification questions.
Expected result: Continue – verify my email becomes available.
If this step does not work
Use a test email address you control. A browser that already has access may skip the form, so use a private window.
- 2
Request the email code
Your info > Continue – verify my email
Select Continue – verify my email.
Expected result: A code is sent to the test email.
If this step does not work
Check the address for typos if the code doesn’t arrive.
- 3
Verify the requesting buyer
Verify email > 6-digit code
Enter the code from the test email.
Expected result: Request an NDA for your buyer group appears.
If this step does not work
Select Resend code if the code expired.
- 4
Propose buyer-side recipients
Request an NDA for your buyer group > Add buyer or agent
Select Add buyer or agent for each extra signer.
Expected result: A card appears with a Buyer or Buyer agent choice, Full name, and Email.
If this step does not work
Buyers can’t add a seller here; you add the seller when you confirm the signers.
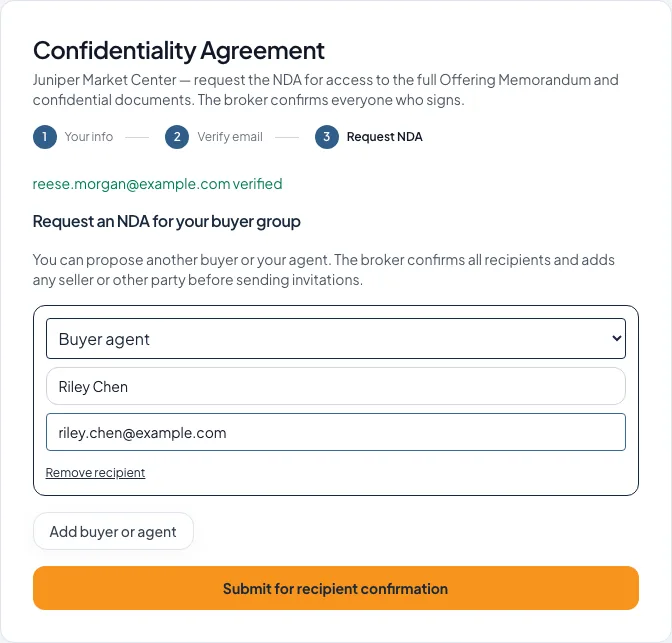
A verified buyer can suggest their agent or another buyer before submitting the request to you. - 5
Submit for broker confirmation
Request an NDA for your buyer group > Submit for recipient confirmation
Select Submit for recipient confirmation.
Expected result: Request Submitted confirms the request reached you. It isn’t a signed NDA and doesn’t unlock any files.
If this step does not work
Each signer gets a personal invitation only after you send the NDA.
- 6
Find the request in your room
Room > Multi-party NDAs
Open the room as the broker.
Expected result: The test buyer shows Awaiting recipient confirmation. You also get an NDA recipient review email, and the buyer appears in CRM with the request on their timeline.
If this step does not work
Refresh the room if the request hasn’t appeared yet.
NDA – Auto Access still waits for everyone
With NDA – Auto Access you skip the separate approval step, but files still wait for you to confirm the signers, for every included party to sign, and for the executed PDF. Listings whose room uses single-signer NDAs work exactly as before.
Access-level reference
Free Access
- What the visitor does
- Views and downloads right away, with no form
- What you get
- Anonymous traffic only: no CRM contact, per-person activity, download alerts, or recipient watermarks
Email Required
- What the visitor does
- Verifies name and email (plus any company, phone, or title you require), then gets instant access
- What you get
- A CRM contact in Leads with every view and download on their timeline
NDA – Auto Access
- What the visitor does
- Signs your NDA, then gets instant access
- What you get
- The signer in CRM, plus the executed NDA emailed to both of you
NDA – Approval Required
- What the visitor does
- Signs your NDA, then waits while files stay locked
- What you get
- The signer in CRM and a pending request you approve or decline
One access setting, two places to change it
A listing’s access level in Listing Hub and its Deal Room’s Access gate are the same setting. Change it in either place and the public property page and the Deal Room update together.
Multiple-signer rooms
If the room uses multiple-signer NDAs, an NDA level starts a request instead of an instant signature. Files open after you confirm the signers, every included party signs, and the executed PDF is ready, plus your approval with NDA – Approval Required.
The inquiry form is a company-wide setting, and every inquiry lands in CRM Leads as a contact you can follow up with.
Troubleshooting and next steps
The visitor skips the gate during testing.
Likely cause: The browser may still hold earlier access or your own session.
- Use a private signed-out window.
- Test with a new email address.
No CRM contact appears.
Likely cause: Free Access does not identify visitors, or processing has not finished.
- Confirm the test used Email Required, an NDA level, or the inquiry form.
- Search Contacts for the exact test email after a moment.
Final verification
- The listing shows the intended access level
- The inquiry form setting is correct
- NDA questions are current
- The signed-out visitor test worked
- The test contact appears in CRM
- A multiple-signer test request shows Awaiting recipient confirmation, with no invitation or file access yet
- No blocking warning, failed status, or unresolved validation message remains in the completed workflow.
Your next OM, done this afternoon
Turn your property facts, photos and financials into a polished, branded offering memorandum. Most brokers finish in 30 to 90 minutes.
No credit card required.