Outcome
Your teammates are invited with the right roles, you know exactly what each change costs, and you can change roles, resend or cancel invitations, and remove people without losing their work.
Navigation path
Team > Invite Member
Access
Admins and solo account owners on a paid plan manage the team. Members and Admins use paid seats; Coordinators are free.
On this page
What you will accomplish
Seat
- Member
- Paid
- Admin
- Paid
- Coordinator
- Free
Documents
- Member
- Own and edit their documents in My Docs
- Admin
- Own documents, see every company document in Team Docs, and Transfer ownership
- Coordinator
- See every company document in Team Docs, Create for Team, and Reassign owner; cannot own documents
CRM
- Member
- Their own records
- Admin
- The whole company
- Coordinator
- The whole company, without ownership transfer or shared-pipeline setup
Listing Hub
- Member
- Listings and Listing sync for their properties
- Admin
- Every tab, including Website & domain, Access & leads, and Appearance
- Coordinator
- Listings and Listing sync
Deal Rooms
- Member
- For documents they can edit
- Admin
- Every company property
- Coordinator
- Every company property
Team, roles, and company settings
- Member
- No
- Admin
- Yes
- Coordinator
- No
Billing & plan
- Member
- View only
- Admin
- Manage
- Coordinator
- Not shown
Need an assistant who can work every deal but not touch billing?
Invite them as a Coordinator. It’s free, and they get company-wide access to CRM, documents, listings, Deal Rooms, and email workflows. They can’t own documents or manage billing, roles, or company settings.
Someone leaving the team?
Transfer their documents first, then remove them. The removal flow moves their CRM book to the teammate you choose. See Remove a teammate below.
Before you start
Data, sources, and access to prepare
- A paid plan
- Admin access to Team
- Each teammate’s email address
Prepare these details
- Collect each teammate’s email address
- Decide each person’s role using the table above
- Check how many paid seats you already have open
Complete the task
- 1
Open Team
Main navigation
Select Team.
Expected result: Your Team Members, Pending Invitations, and company settings load.
If this step does not work
If Invite Member is missing, you need Admin access and a paid plan.
- 2
Open the invitation flow
Team
Select Invite Member.
Expected result: Invite team members opens with an Email address field and a Role guide.
If this step does not work
If billing is under maintenance, the button is paused; try again later.
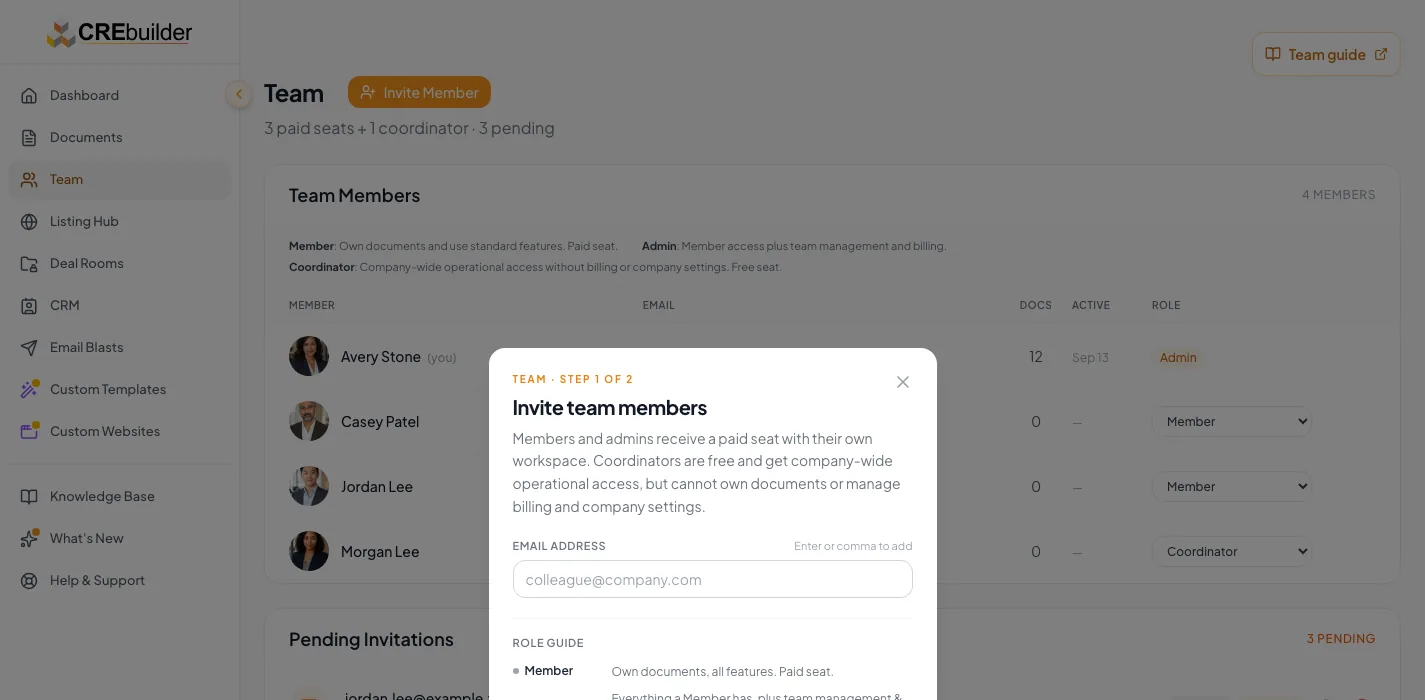
Invite a teammate, assign the least-privileged suitable role, and verify available seats before sending the invitation. - 3
Add one email address
Invite team members > Email address
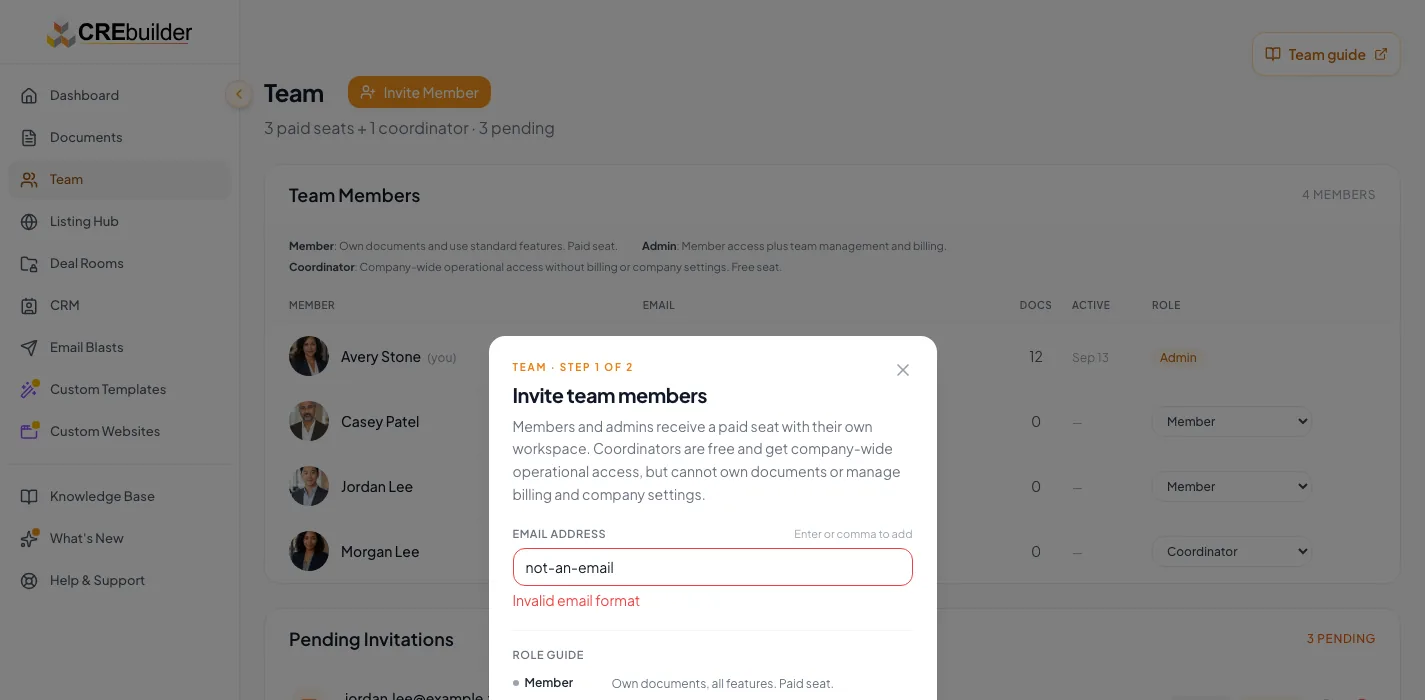
Enter a teammate’s email address.
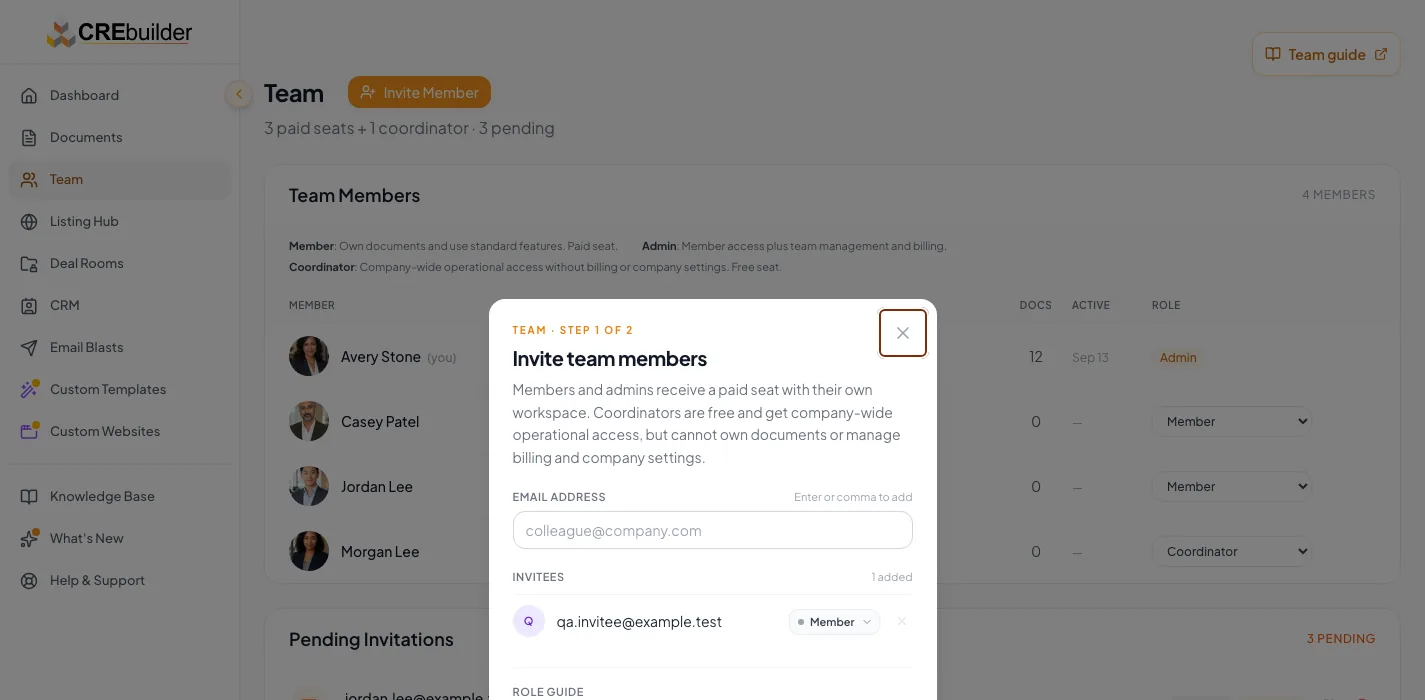
Expected result: Press Enter or type a comma and the address joins the Invitees list. Add as many as you need.
If this step does not work
Fix the message shown: Invalid email format, Already a team member, Already has a pending invite, or Already added.
- 4
Choose the role
Invite team members > Invitees
Select Member, Admin, or Coordinator for each invitee.
Expected result: Each row shows its role. New invitees start as Member.
If this step does not work
Use Coordinator for support staff who need company-wide access without a paid seat.
- 5
Review the confirmation
Invite team members
Select Continue.
Expected result: The Billing Summary shows your current paid seats, paid invitations, new paid seats, and any free coordinators. It says either No new charge, or that new paid seats will be billed immediately when you send.
If this step does not work
Select Back to change a role or remove an invitee.
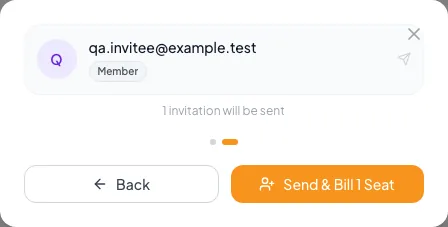
Check the available seat and intended role before inviting a teammate. - 6
Send the invitations
Invite team members > confirmation
Select Send Invite, or Send & Bill [number] Seat when new seats are needed.
Expected result: When every invitation succeeds, the dialog closes and the invitees appear in Pending Invitations.
If this step does not work
If some addresses fail, a Results screen lists them under Not invited with the reason.
- 7
Close the result
Invite team members > Results
Select Done.
Expected result: Invited teammates show a Pending badge in Pending Invitations.
If this step does not work
Invite only the failed addresses again after fixing their reason. Paid quantities for failed invites are removed.
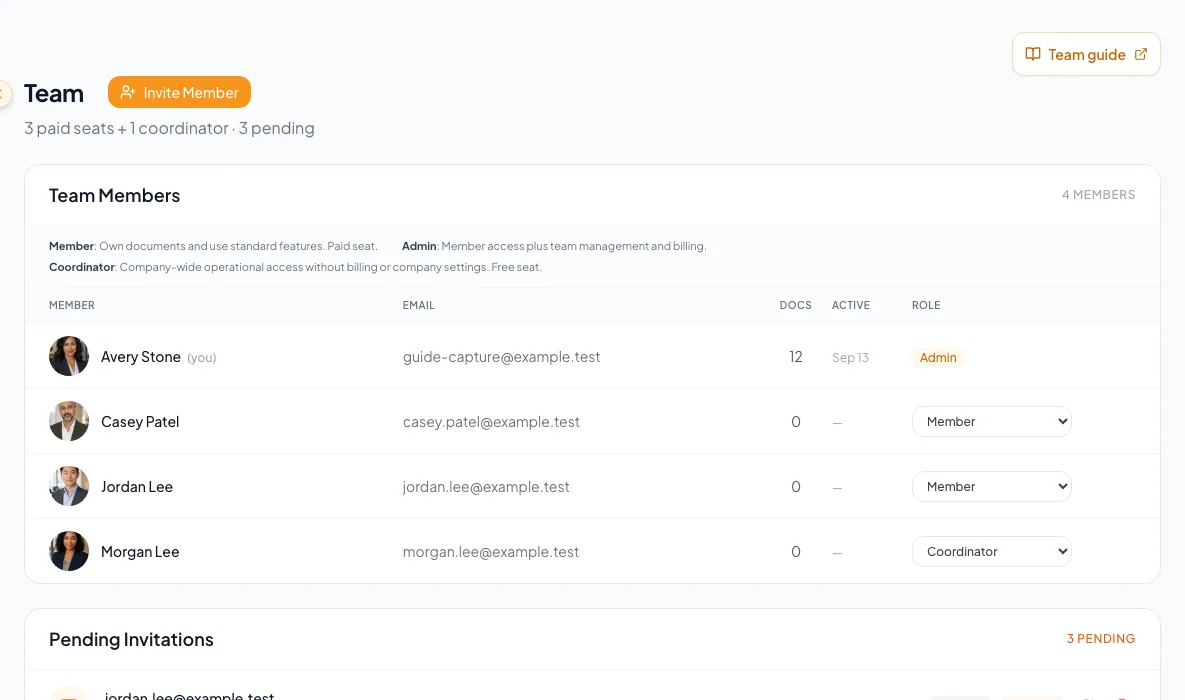
Verify the teammate role and invitation status.
If your account is on a prepaid term
On a prepaid annual or monthly term, the confirmation button reads Review paid seats first when you need more paid seats. Buy the seats in Team first, then send the invitations. Existing open seats can be used right away.
Buy seats on a prepaid term
- 1
Open the prepaid seat purchase
Invite team members > confirmation
Select Review paid seats first.
Expected result: Team scrolls to Additional paid seats with the needed number filled in. Nothing is charged and no invitation is sent yet.
If this step does not work
If seat purchases are temporarily unavailable, contact Support. Your open seats still work.
- 2
Request the seat quote
Team > Additional paid seats
Select Review price.
Expected result: The quote shows the one-time payment through your term end date and your renewal amount on that same date. The quote is valid for 10 minutes.
If this step does not work
Change Additional seats (1 to 20) before requesting the quote if you need a different number.
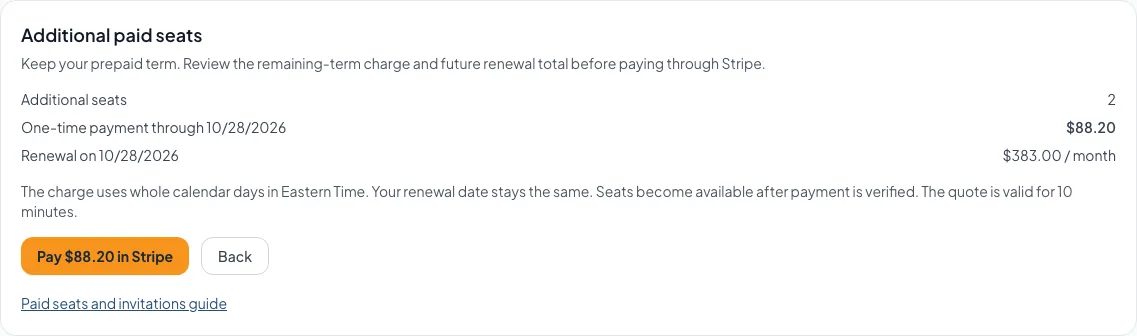
Review the monthly seat charge and the unchanged renewal date before paying. - 3
Review the seat charge
Additional paid seats > quote
Compare the one-time payment with the renewal amount and date.
Expected result: The charge uses whole calendar days in Eastern Time, and your renewal date stays the same.
If this step does not work
Select Back to withdraw the quote if the terms are not right.
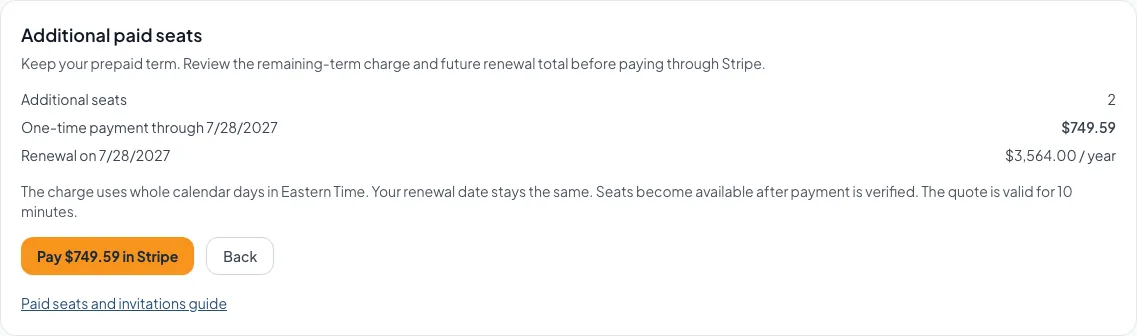
Review the annual seat charge and future renewal before approving Stripe Checkout. - 4
Pay in Stripe
Additional paid seats > quote
Select Pay [quoted amount] in Stripe.
Expected result: Stripe opens the exact quoted payment and returns you to Team.
If this step does not work
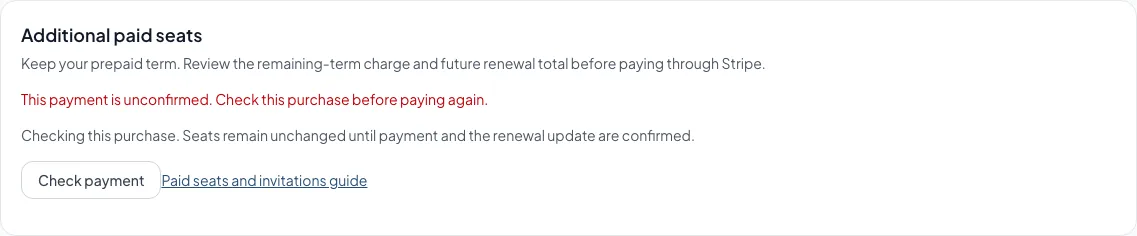
After an interruption, use Check payment or Continue payment in Stripe on the same purchase instead of starting a new one.
- 5
Verify the paid capacity
Team > Additional paid seats
Wait for Payment confirmed.
Expected result: Your new paid seats are available. Open Invite Member again to send your invitations.
If this step does not work
If the purchase needs billing support review, keep it open and contact Support before paying again.

Confirm the payment and available paid seats before inviting a teammate.
Before you make someone a Coordinator
Coordinators can’t own documents. Transfer any documents the person owns to a Member or Admin first.
Change a teammate’s role
- 1
Change a teammate’s role
Team > Team Members > Role
Select the new role in the teammate’s Role menu.
Expected result: A confirmation explains the change. Coordinator to Member or Admin adds a paid seat billed immediately. Member or Admin to Coordinator drops the paid seat immediately, with no refund or credit for unused time.
If this step does not work
Select Cancel to keep the current role. You cannot change your own role or the account owner’s.
- 2
Confirm the role change
Change role dialog
Select Change Role, or Change Role & Update Billing when the seat count changes.
Expected result: The Role column shows the new role.
If this step does not work
If paid role changes are temporarily closed, the role resets; try again later.
Resend or cancel an invitation
- 1
Resend an invitation
Team > Pending Invitations
Select Resend invitation on the row.
Expected result: CREBuilder emails a reminder with the same invitation link. Invitations stay open until accepted or cancelled, and a pending paid invitation already holds its seat.
If this step does not work
Check the address for typos if the teammate still cannot find it.
- 2
Cancel an invitation
Team > Pending Invitations
Select Cancel invitation on the row.
Expected result: A confirmation appears. For a paid role, the paid quantity drops immediately, with no refund or credit for unused time.
If this step does not work
Close the dialog to keep the invitation.
- 3
Confirm the cancellation
Cancel invitation dialog
Select Cancel Invitation.
Expected result: The row leaves Pending Invitations and its link stops working.
If this step does not work
Send a new invitation if you cancelled by mistake.
Remove a teammate
- 1
Transfer their documents
Documents > Team Docs > document menu
Select Transfer on each document the teammate owns.
Expected result: Each document moves to the teammate you choose. In Team, their Docs count drops to 0.
If this step does not work
Removal does not move documents, so finish this first.
- 2
Check their listings and Deal Rooms
Listing Hub and Deal Rooms
Review the listings and rooms tied to their properties.
Expected result: Each live listing and room belongs to a document that now has an owner on your team.
If this step does not work
Transfer any document you missed before continuing.
- 3
Remove the teammate
Team > Team Members
Select Remove member on their row.
Expected result: If they own CRM records, Move their book first opens with counts of contacts, deals, accounts, tasks, commission splits, properties, opportunities, and listing progress. Otherwise, a confirmation explains the removal.
If this step does not work
Select Cancel if you are not ready.
- 4
Choose who receives the CRM book
Move book first dialog > Transfer everything to
Select the teammate who should take over their CRM records.
Expected result: Transfer & remove becomes available.
If this step does not work
Invite the right person first if nobody suitable is on the team yet.
- 5
Confirm the removal
Removal dialog
Select Transfer & remove, or Remove Member when there is no CRM book.
Expected result: They lose access to all documents and content immediately. A paid seat drops right away, with no refund or credit for unused time. This cannot be undone.
If this step does not work
If paid removals are temporarily closed, try again when the banner clears.
Seats and billing effects
| Action | Billing effect |
|---|---|
| Invite a Member or Admin with an open paid seat | No new charge |
| Invite a Member or Admin with no open seat | Send & Bill adds the seat and bills it immediately (prepaid terms buy seats first) |
| Invite a Coordinator | Free |
| Coordinator to Member or Admin | Adds a paid seat billed immediately |
| Member or Admin to Coordinator | Paid seat drops immediately; no refund or credit |
| Cancel a paid invitation | Paid quantity drops immediately; no refund or credit |
| Remove a Member or Admin | Paid seat drops immediately; no refund or credit |
A pending paid invitation holds a paid seat until it is accepted or cancelled. The Team header shows your paid seats, coordinators, and pending invitations at a glance.
Troubleshooting and next steps
An email cannot be added.
Likely cause: It is invalid, already a member, already invited, or already in the list.
- Read the message under the field.
- Correct the address, or manage the existing member or invitation.
A paid invitation, role change, or removal is paused.
Likely cause: Billing maintenance or a temporary hold on paid seat changes.
- Read the banner at the top of Team.
- Try again when it clears.
You cannot change a teammate’s role.
Likely cause: You cannot change your own role or the account owner’s.
- Ask another Admin to change your role.
Final verification
- Every invited email is correct
- Each role matches the work the person does
- The Billing Summary charge was expected
- Invited teammates show as Pending
- If you removed a teammate, their documents were transferred first and their CRM book went to the right person
- No blocking warning, failed status, or unresolved validation message remains in the completed workflow.
Related tasks

Your next OM, done this afternoon
Turn your property facts, photos and financials into a polished, branded offering memorandum. Most brokers finish in 30 to 90 minutes.
No credit card required.